


")

_Page_01")
Grab your coffee and let’s untangle a big and common kitchen conundrum– updating a traditional kitchen without remodeling.
If you’ve just moved into an older home with a traditional kitchen, and your first instinct is “we need a full remodel,” take a breath.
There is a budget-friendly way to update a traditional kitchen without remodeling the whole kitchen — and in many cases, it’s the best way to protect your sanity and your savings.
In this Ask A Designer session, I walked a homeowner through an easy way to modernize her kitchen and nearby living room zones without committing to a full kitchen remodel.
The goal wasn’t demolition. It was creating new life, a fresh look, and real transformation through smart, strategic decisions — not chaos.
Below are the exact kitchen makeover ideas we talked through, plus deeper insight into how to refresh your space, create a modern look, and achieve a significant impact without blowing everything up.
Top Items That Date Kitchens (And Simple Fixes That Go a Long Way)
Before we dive headfirst into the consult rundown, let’s break down the top kitchen faux pas that make your space feel dated — just in case you don’t wanna read the whole thing 😉
Sometimes we look at a kitchen, and all we see is “everything’s gotta go”.
But small changes — the right small changes — can make a huge difference. Dare I say… a weekend project?
Old Kitchen Cabinets
Old kitchen cabinets feel dated almost always because of the finish — not because they’re unusable.
Either they are real-wood cabinets and the stain colour is no longer in style, or they are laminate or melamine in a colour that screams old-school. If they’re in good condition, ripping them out for a full remodel is rarely the best way forward. Instead consider:
- A fresh coat of paint or stain. The power of paint is unreal. Always test a paint sample first — undertones matter more than trends.
- If the boxes function well but the style doesn’t aesthetically work for you, replace just the doors and drawer fronts. Companies like Kitch Components (for Ikea frames) or Nieu Cabinets (completely customizable) can create new doors and drawer fronts for existing boxes in a range of different styles and finishes.
- Vinyl wraps (like 3M) are an inexpensive way to transform cabinet fronts without replacing them. Think of it as a giant sticker with a surprisingly polished result.- prints, wood grains, sheens, and different colors. You name it, they have a vinyl for that.
- Swap the cabinet hardware. This is an easy diy project with a big impact and one of the quickest ways to breathe new life into your space.
Lighting (The Most Underrated Update)
Lighting dates a kitchen faster than almost anything. It’s key in a kitchen for function, and installing it makes a huge difference in both function and atmosphere.
Many older homes lack under-cabinet lighting — If rewiring isn’t on the table, rechargeable LED options are a great place to start—some are even motion-activated!
To roundout your kitchen lighting needs, add:
- New light fixtures over the island
- Updated dining fixtures
- Sconces for decorative accents
- Or swap outdated pendants for something linear and clean
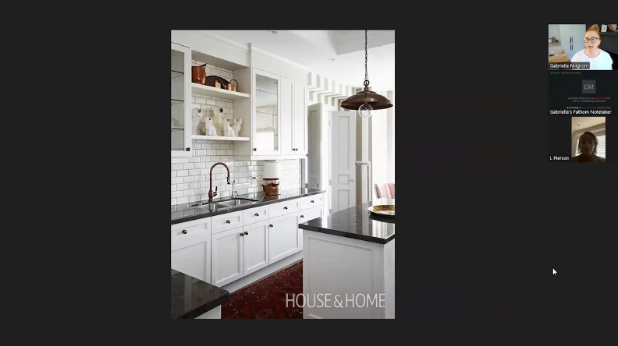
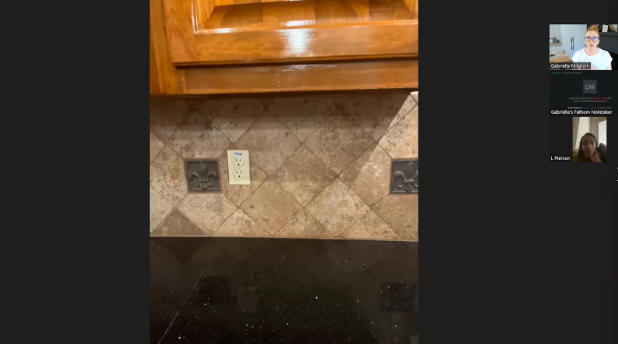
Overly Patterned Backsplash Tile
Heavily patterned backsplash tile had its moment. That moment has passed.
If you want longevity and a clean look, consider a simplified new backsplash.
Classic subway tile, while considered “boring,” remains timeless — and can be installed in multiple patterns to create subtle visual interest. Or square zellic tile if you are seeking something more organic and less linear.
This doesn’t mean you need to rip out the old and put in new.
- Paint the existing tile as an affordable update and a great place to start. Add a cute stencil to give some personality and depth.
- Use peel-and-stick options over the existing tile (only if the current tile is flat, without any texture).
- This product allows you to install tile over tile. Just remember that you are increasing your wall thickness by the depth of the 2nd wall tile, so electrical outlets will need to be adjusted to sit flush.
Non- Full Height Upper Cabinets
That space above your upper cabinets? Dust collector. Wasted real estate.
And staggered cabinet heights “for dimension”? Most of the time, it just makes the kitchen look and feel unfinished.
If you can’t add more upper cabinets, box it in. Frame a bulkhead above, add crown molding, and finish it to match. Instant polish!
Bonus: that flat surface becomes a great place for picture lights or subtle decorative accents to elevate the space — without a full remodel.
Countertops (Proceed With Caution)
Too many homeowners rip out perfectly durable counters during a kitchen renovation, chasing a color change, or to be “on trend”. Granite in a traditional kitchen can absolutely feel current when paired with the right lighting and hardware.
Instead of demolishing, consider these options:
- Pull undertones from the countertop and coordinate cabinet paint accordingly. Well-paired cabinet colours and coordinating backsplash will mask the countertop colour and make the space feel intentional.
- Try epoxy refinishing if necessary. Rustoleum has a great 2-part epoxy countertop product that will give you a beautiful finish and a design that looks like stone
- Countertops are another area where vinyl wraps are an economical option. Especially when you are seeking a quick, budget-friendly fix– – aka you don’t have $20k to drop on new countertops.
Paint and Window Treatments
Paint is the easiest and often simplest way to refresh a dated space. A new coat of paint on your walls in a fresh colour– instant facelift. Be sure to select a colour that works with the undertones you are keeping and the design direction you are moving towards.
Overly patterned window treatments read heavy and pull focus (in the wrong way). Fresh window treatments are always a great place to start and give such a clean look once in place.
Quick snapshot: the situation we were solving
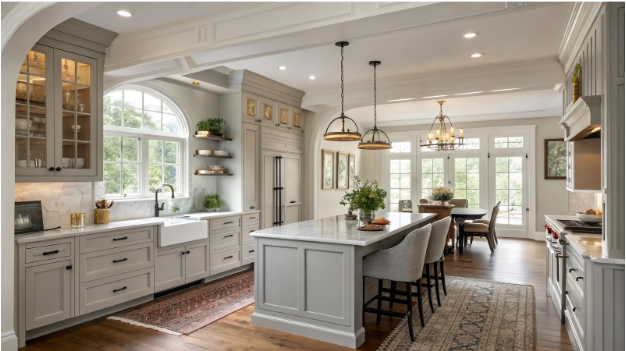
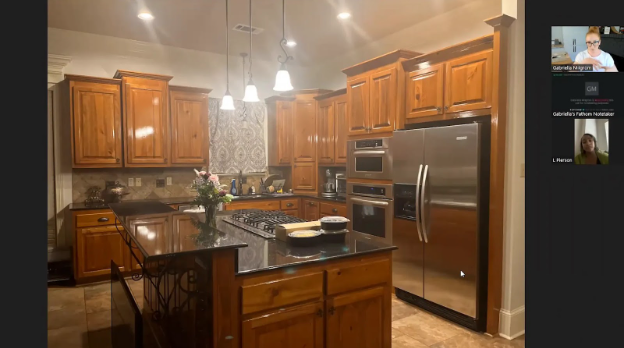
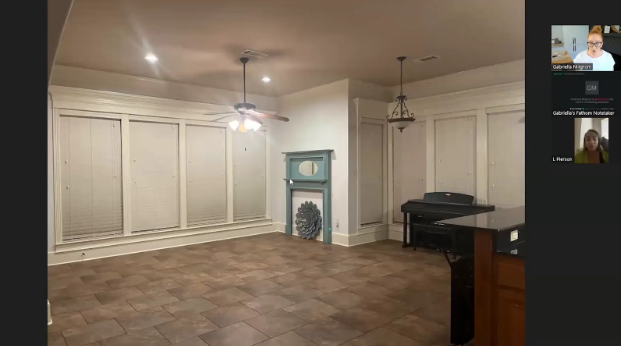
House vibe: traditional details everywhere (lots of crown molding, ornate window trim), but the homeowner wants a fresher, more modern look.
Layout: open concept — kitchen opens to dining and a “keeping” (casual sitting) area — tile floors are darker/taupey and ceilings lean brown-taupe.
Client constraints: Cabinets are real wood (not keen to replace); wants to brighten, define zones, and avoid a full demo. Seeking a fresh new look that gives big impact, but doesn’t involve a full kitchen remodel — just yet.
Looking for small changes to create an updated look, visual interest, and cohesion across the open concept floor plan.
Start with the “why” (because Pinterest will lie to you)
Before we pick paint swatches or obsess over a backsplash, we need to pause and ask:
What functions need to occur in these living spaces?
What feelings are we trying to create between the kitchen, dining, and keeping room?
Bright? Gathering-focused? Casual and plush?
Once you name it, design decisions fall into place much more easily — because now we know what we’re actually working toward. A casual and plush space is going to look very different aesthetically than a space focused on creating gathering points between family and friends.
Same square footage. Completely different energy.
It’s very easy to get lost in the visually appealing world of image hunting when it comes to a kitchen renovation.
Pinterest will happily show you a thousand pretty kitchens. But when we focus only on the aesthetic, we forget the actual problem that needs solving — and the ultimate goal of the renovation.
The best place to start is not with images.
It’s a list.
A list of what’s not working.
And a list of what we’re trying to achieve.
Not working could be:
- not enough storage
- flow between zones in the kitchen doesn’t make sense
- not enough countertop space
- appliances don’t meet needs
- countertop type and quality is poor for how you cook
- or simply that the look, style, and feel of the space does not match your vibe — or the vibe you’re creating for your home
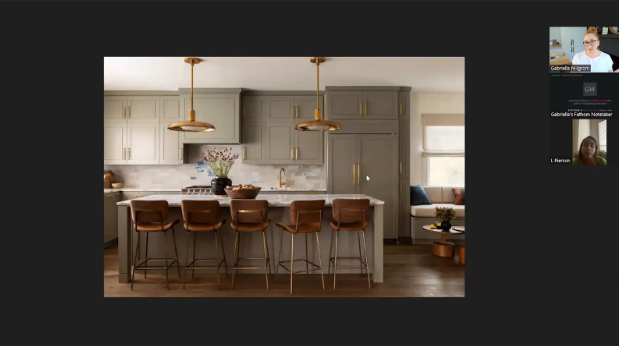
Trying to achieve could be:
- a focal point between the kitchen and living room
- an affordable update that keeps the existing boxes and wood fronts, but updates the rest of the space through decorative items and different finishes
- cohesion between the main floor
- a bright, airy, welcoming space that feels open and inviting
- a gathering space that invites family and friends to spend time together
- a fresh look that feels like you
- more storage with a focus on display shelving
- a casual space to eat as a family
When we clearly define what’s not working and what we’re trying to achieve, we suddenly have a much stronger filter for image searches. Instead of typing “modern kitchen,” we can search more intentionally– “modern kitchen ideas that tie into a living room and feel cohesive.”
It’s a small shift. But it yields much better search results — full images and details that actually align with your specific needs, not just what’s trending this week.
Phase it: why splitting the work saves your sanity (and wallet)
A full kitchen demo = pricey and overwhelming. Full stop.
Instead of jumping straight to a full kitchen remodel, break your kitchen makeover into intentional phases. This is a great way to control budget, decision fatigue, and that spiraling “well if we’re doing this…” energy.
Here’s the example timeline we walked through:
Phase 1:
Paint ceilings & walls bright (white ceiling, off-white walls), swap lighting & add new hardware, paint cabinets (or restain), and update window treatments.
This phase alone can create a big impact and dramatically shift the overall feel of the space.
Phase 2:
Opt for a new backsplash (there are a few options to consider depending on price point), swap out the island brackets for more linear versions, and change the pendant lighting location to better suit how you cook and use the space.
These are refinement moves. They add visual interest and cohesion once the base layer feels right.
Phase 3:
If the aesthetic changes aren’t quite hitting home — and more needs to be done — then address the functional issues. Modify cabinet locations if necessary and add new flooring.
Only now are we having the bigger conversations.
I threw out a hypothetical $20k during the consult to illustrate prioritization — but the real point wasn’t the number. It was this: prioritize the moves that change the feel first. Light. Scale. Materials.
Painting cabinets—but do it smart
If your cabinets are lacquered (hi, we see you), painting them will require stripping and proper prep. Not impossible — just more work-intensive. And this is not the place to wing it.
Speak to a specialist at your local hardware or paint store and get very clear on:
- how to strip without damaging the wood grain
- how to properly prep
- how to refresh the surface before you paint or stain
This is one of those areas where doing it properly is the difference between “fresh look” and “why is this peeling in six months?”
Now — when it comes to choosing your paint colour, please do not crowdsource trending whites from Facebook groups. Neutrals that “work everywhere” do not, in fact, work everywhere.
Instead, pull a colour from the undertones in your floor tile or your countertop — typically creams, soft greige, or an off white. This instantly ties your new cabinets into the existing finishes and prevents the dreaded scope spiral.
You know the one — you update one thing and suddenly everything else feels wrong.
That ALWAYS happens when undertones aren’t checked. The fresh highlights the old — and not in a good way. It’s preventable. You just have to be intentional.
Keep the granite (yes, really)
Hot take on countertops: keep the black granite.
It’s durable. It’s forgiving. And it’s likely still in great condition.
Rather than ripping it out for quartz (which can stain or show heat marks), work your palette and new backsplash around the existing stone. You’ll save thousands — and you’ll get a cohesive, modern result without a full remodel.
Also? Natural stones are making a comeback. The pendulum swings. It always does.
Sometimes the best way to update the look of your kitchen isn’t removal — it’s reframing.
Backsplash options without the demo headache
You do not always need to tear out tile to get a fresh new look.
Options:
- Tile on top of tile (yes, you can). Clean thoroughly with TSP, prep properly, then install overtop.
- Peel-and-stick or press-on tiles — a great budget-friendly way to test a new backsplash without committing to a full kitchen remodel. There are genuinely good options out there now.
- Paint glaze for tile — works best on simpler shapes and finishes.
- Glass or subway tile sheets installed over existing tile for a sleek, modern finish.
A new backsplash goes a long way in shifting the kitchen’s look — and it doesn’t have to involve dust, dumpsters, and demo week.
Lighting and ceiling details = modernity shortcut
Lighting dates rooms faster than almost anything.
Swap the low dining fan for a flush or semi-flush fixture (and if you need a fan, mount it properly). Replace the clustered island pendants with either one long linear fixture or two oversized pendants that actually anchor the space.
And please — ditch the drop pendant over the sink that screams “older home.”
Consider sconces. Or a single, clean modern pendant.
Add under-cabinet lighting. It makes a huge difference — both functionally and aesthetically. Suddenly your countertops glow, your backsplash has depth, and the whole kitchen feels elevated.
For cohesion, try to source fixtures from the same lighting line so your kitchen, living room, and keeping room visually speak the same language.
New light fixtures are one of the fastest ways to create a modern look without touching your layout.
Box in the cabinets (a game-changer)
Sometimes raising the upper cabinets is the solution (if they sit 18″ above counter, they can often be raised to 24″). But if height won’t allow that without compromising usability, there’s a budget-friendly way to solve it.
Build a boxed-in run above the cabinets — essentially a bulkhead — then finish it with crown molding and the same cabinet finish. Suddenly it reads intentional and polished, not like an afterthought dust shelf.
That flat surface also becomes a great place for art lights or small wall sconces — subtle decorative accents that add another layer of sophistication.
It’s a small architectural tweak that makes the whole kitchen feel finished.
Hardware: the small swap with big return
Cabinet hardware is an easy DIY project with a significant impact.
Update upper cabinet pulls (ditch the cross-pattern ones), and if you love the scalloped cap handles — keep them. They’re coming back.
For metal finish, oil-rubbed bronze is timeless. Polished chrome can lean dated in traditional kitchen settings.
Choose hardware that complements both your cabinet paint and the black granite so everything feels cohesive — not pieced together.
It’s a small move. But it goes a long way.
Define the keeping room with a rug and scale
Right now, the tile makes the keeping area feel cold and disconnected from the kitchen.
If this is meant to be a small gathering space off the kitchen, it needs warmth and softness.
A large area rug is the quickest fix. Think oversized. Think textural. Think something that introduces softness underfoot.
You can go cream/off-white for a safe, bright lift — or choose a patterned rug that introduces color you’ll repeat in pillows and drapery.
No construction. No demo. Just definition.
And suddenly the kitchen and living room feel like they belong to each other.
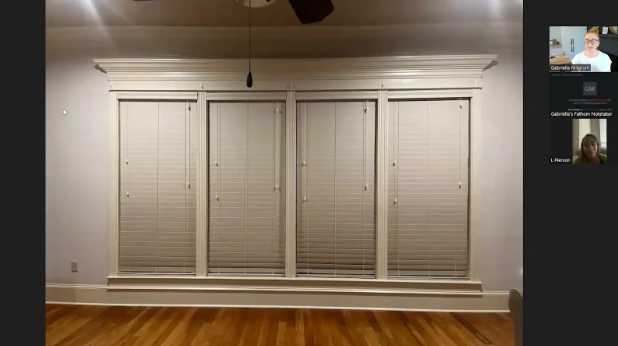
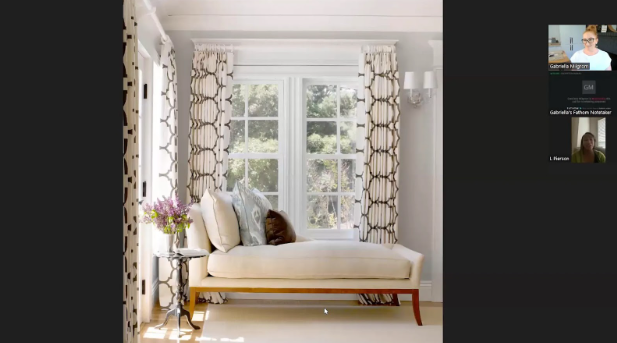
Window treatments that actually help
That window crown detail is beautiful — but heavy.
Normally we’d mount drapery above window trim to elongate the room. But here, the crown sits just below the ceiling crown molding, leaving no obvious rod space.
So instead, mount the drapery rail just below the curved edge of the crown. Let the fabric slip into that visual gap so it creates a long, clean vertical line rather than chopping the wall.
For multiple windows, measure the total width and divide by three to determine panel widths. Stack panels two left / two right so they drape generously and don’t look strained when closed.
The goal isn’t to hide the architecture — it’s to soften it and give the room a cleaner, more intentional line.
Final pep talk
Updating the look of your kitchen doesn’t always require tearing it down to the studs.
The best way to modernize a traditional kitchen in an older home is often incremental. A fresh coat of paint. Updated lighting. Refined hardware. Defined zones.
These moves bring new life and a fresh look — without committing to a full remodel.
Sometimes it’s about buying time.
Sometimes it’s about creating tolerance while you plan for the future.
And sometimes?
It’s realizing you didn’t need a complete remodel in the first place.
And yes — sometimes it’s a bit of a band-aid solution that lets you tolerate the space you spend so much time in while you save for a full kitchen redesign 😎
Do you have a unique design, building dilemma, or question? While I no longer execute video Ask A Designer consults, my Designed & Delivered Blog has a special section, Design Files, dedicated to answering your specific design and build questions. Fill out this form with your project details, and your answer will be featured on the blog.

")


")
")
")
")


")

")
")


Read the Comments +